
 By Scott Lupia/photos by the author except where noted
Modeling Erie Lackawanna GP7 diesels has always been a tricky endeavor, mainly because there has never been a single model that got you close enough to the specific details. Even though Erie Lackawanna had just over 70 GP7s on the roster, they came from several orders and from two different railroads (Erie and Delaware, Lackawanna & Western, which merged in 1960 to form Erie Lackawanna). Almost every order from Electro-Motive had unique features and details creating groups of different engines.
Recently Atlas released HO scale GP7s in the “Classic” line decorated as EL 1220, 1235, and 1244. These new models have something that has not been seen before on an Atlas model, which is the 800-gallon fuel tank. This model makes it unnecessary to hack apart the frame in order to fit a smaller fuel tank. Many of the GP7s on the Erie Lackawanna roster had the smaller fuel tank, so this model is the perfect choice.
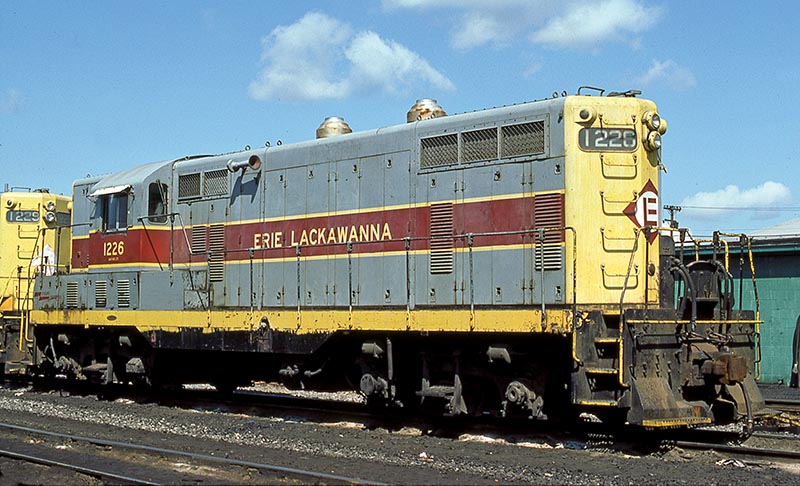
ABOVE: Just a few months into Conrail, former EL 1226 suns itself in Buffalo, N.Y., on August 2, 1976. Note the silver spark arrestors. —Michael Tedesco photo, Randy Curlin collection
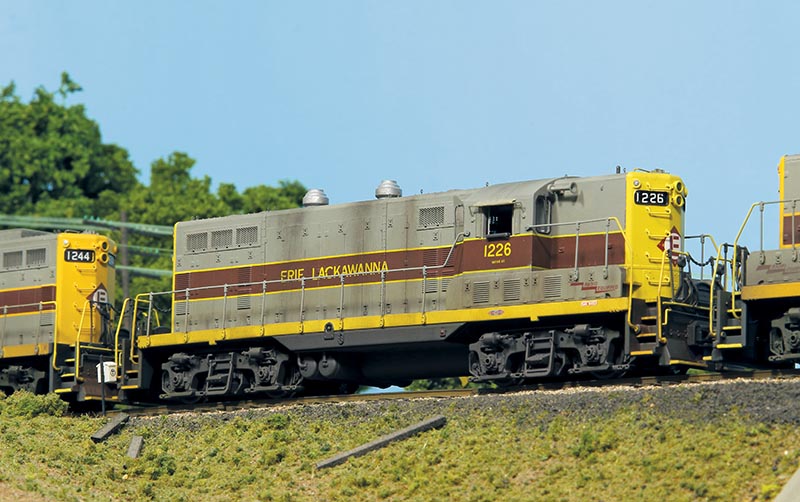
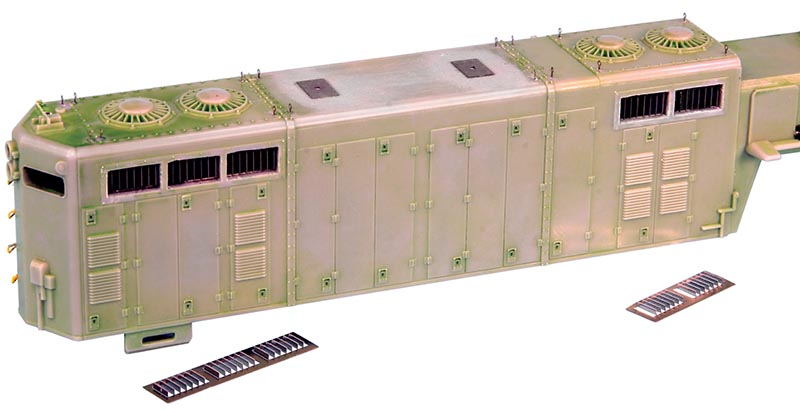
Examining the details and features of the Atlas model, I discovered that the group numbered 1224-1228 was the closest match. After looking at numerous photos I decided that 1226 was the engine I wanted to model. Originally built in 1951 for the Erie Railroad, the unit became Conrail 5964 after 1976 and was later retired and presumed scrapped. Key features were the large round spark arrestors that were applied to the engine later in its life and the small red “Safety First” logo on the front of the short hood.
I purchased a decorated model and stripped it for this project. My process for detailing is to always do the rough stuff prior to adding details. That means any work that requires holding the model firmly, jostling it around and cutting parts off should be done first.
Body Details
I wanted to add etched intake shutters and screens, so that required cutting out the plastic screens. I do this by drilling holes around the inside perimeter of the screens and then cutting from hole to hole with a sharp X-Acto knife. That will get you a rough opening and then the rest of the work can be done with files and sanding sticks.
Once the rectangular openings are cut out I remove the exterior detail around the intakes. That means slicing off the bolt heads and raised lip around the intakes. I use a brand new X-acto blade to do this. A dull blade will make the job difficult, so splurge and go for a sharp new blade.
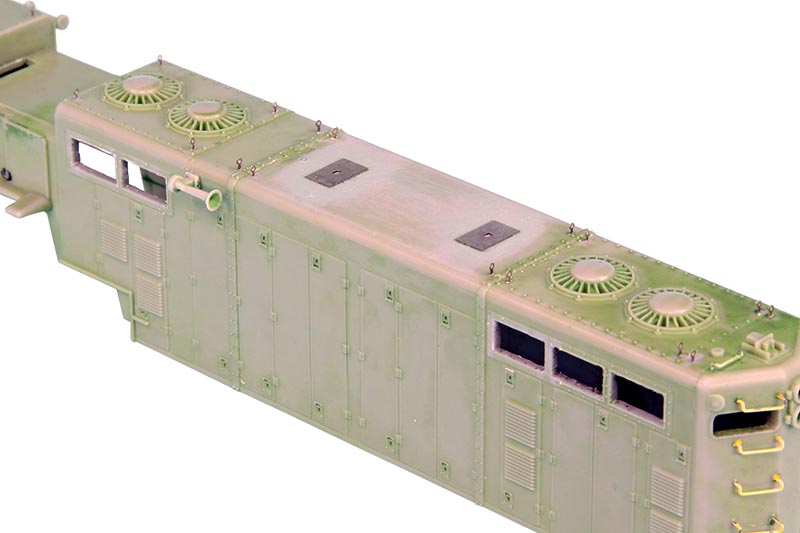
ABOVE: The exhaust stacks have to be removed in order to add the spark arrestors. The base plate was sanded smooth and replaced with etched metal exhaust stack base plates. Etched lift rings have also replaced the molded plastic nubs.
With the cutting on the sides done I turned to the roof. The addition of spark arrestors means the two exhaust stacks have to be removed. I used a cutting wheel in my Dremel Moto Tool to remove most of the exhaust stack. I then sanded the base plate flush with the roof. I added etched metal exhaust stack base plates from KV Models to the roof. Cyanoacrylate adhesive (CA) works quite well for attaching the etched parts to the plastic shell. While working on the roof I removed all of the molded-on lift ring nubs with an X-Acto knife. I replaced them with KV Models etched metal lift rings.
I wanted to add the intake shutters prior to painting the model so there would be fewer loose parts to paint. I bent the shutters into the opened position since I model the summer months when the engines would be running hot and have opened shutters. It is worth noting that modeling the shutters in the closed position actually shows them better since you can see them from any angle. You can only see opened shutters when viewing from the sides at an extreme angle. I attached the shutters to the inside of the shell with a few drops of CA.
ABOVE: The etched intake shutters are added to the inside of the long hood. The shutters have been bent into the opened position.
I don’t really like the solid piece of long hood that goes through the cab area so I cut it out. This cuts down on the depth inside the cab and makes it look a little less realistic. I marked the area to be cut with a marker and then cut the piece out with a cutting wheel chocked in my Dremel. The cuts don’t have to be pretty since they will be mostly hidden, but I do clean them up with a sanding stick when finished. This removal of material does not in any way diminish the structural integrity of the shell once the cab is reattached.
Installing the spark arrestors was done by slicing off the mounting pin at the base of the spark arrestor and attaching them directly to the exhaust base plate with CA. I didn’t feel like drilling through the stainless steel base plate to mount the arrestors by the pin. There is plenty of contact area on the bottom of the spark arrestor, so there was no doubt in my mind that they would stay put once attached…
