
 By Scott Lupia/photos by the author
For as long as I have been a railroader I have always loved working on switchers (or “pups,” as we lovingly call them). For drilling cars around the yard there is just nothing like a pup. EMD’s end-cab design made for an almost perfect machine capable of doing the seemingly impossible. The combination of the right amount of power and adhesion, visibility, and strong brakes made for a very dependable locomotive. I would take a pup over any other engine any day of the week.
That affection for the pup at work definitely spilled over into my hobby. When I saw that Walthers was releasing an HO model of the Phase 5 NW2, I couldn’t wait to get one. Choosing Conrail as the prototype for the model was easy since that was the railroad that I had grown up with.
Conrail’s formation in 1976 to take over six failing Northeastern railroads meant that a number of NW2 switchers were candidates for inclusion. Many had specific details from their previous owners that made them different from their brethren. In total, EMD constructed 1,145 units between 1939 and 1949. I chose to focus on the handful of Phase 5 NW2s that were acquired by Conrail.
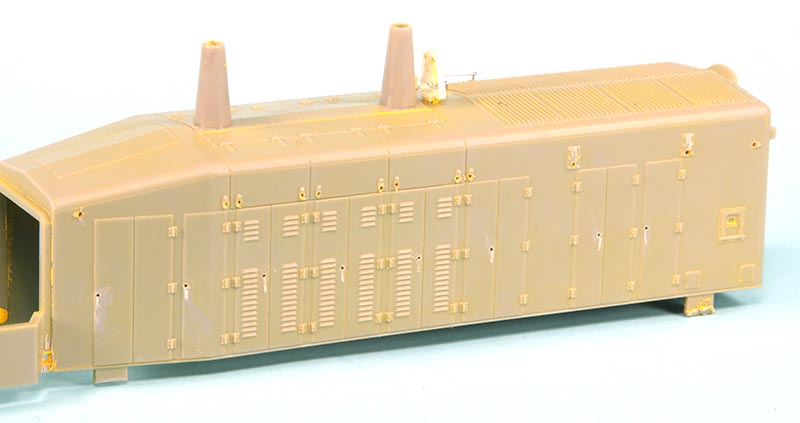
ABOVE: The shell has been stripped of paint and the side drop grab irons have also been removed. After the plastic handrail stanchions and door handles are removed, mounting holes are drilled with a #80 drill bit in a pin vise for the replacement etched detail parts.
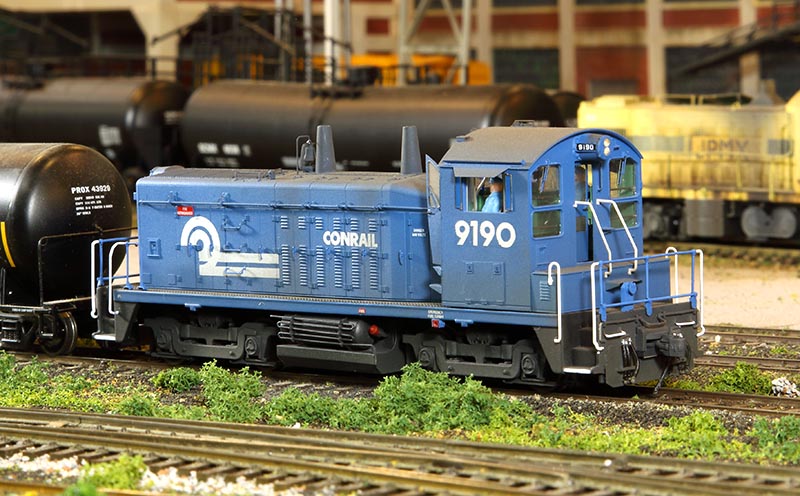
I chose to model Conrail 9190, built as Indiana Harbor Belt 8809 in 1949, later transferred to Penn Central to become 9107. One of the criteria for my choosing 9190 was that it wore the “modern” Conrail paint with the “can opener” logo. Many of the other NW2s on the roster had interim patched paint schemes or very early Conrail blue paint with minimal markings.
 Getting Started
One aspect of the Walthers NW2 that I love is that, for someone like me, the model is a blank canvas. It is well-detailed but leaves plenty of room for further work. After I had disassembled the model I placed the shell (minus the cab window glazing) into my Scalecoat II paint stripper. A day later the paint was removed and ready for detailing.
I always do all of the cutting and removing of cast details prior to adding my details. This eliminates the need to handle the model delicately while I try to remove items with the X-acto knife blade. I removed the long hood handrail stanchions and railing first. Whenever possible I replace the plastic stanchions with etched metal stanchions which are finer in detail. I also like to use .015” phosphor bronze wire for the handrail.
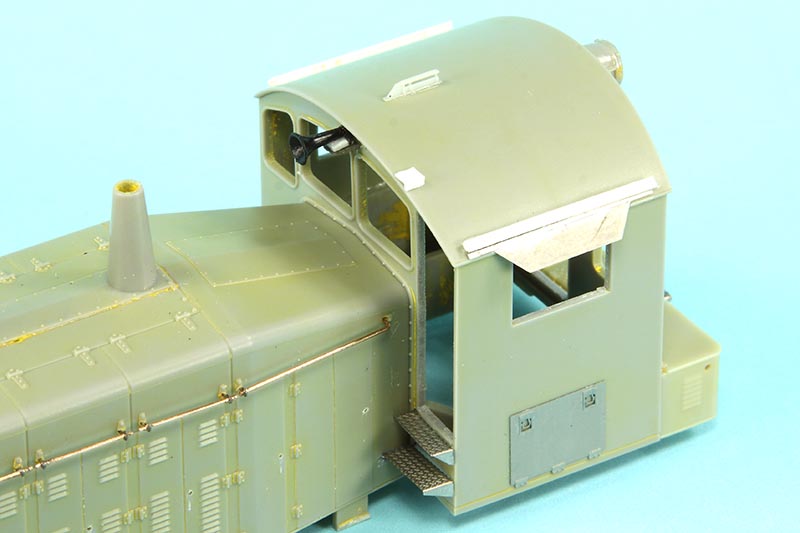
ABOVE: The cab details include a scratchbuilt sunshade track, etched steps, Sinclair antenna, new horn, and beacon platform. The beacon was not a part of the 9190 as modeled as a Conrail engine but the platform remained. The horn on the cab was part of an Atlas three-chime horn from the parts bin. The horn was cut off and mounted on a piece of scrap styrene that was attached to the KV Models SW7 horn mounting bracket. The resulting assembly looks good and is much sturdier than the horn that came on the model.
One notable spotting feature of the NW2 (and SW7) is the six power assembly hatches that are on the top and sides of the long hood on either side of the exhaust stacks. The handrail is mounted to these doors but is actually broken into sections so the doors could be opened individually.
The model has a single continuous handrail so that is another reason I wanted to replace the handrail. The segmented handrail does show itself quite readily without having to look too hard at the model. Once the plastic stanchions were removed I drilled mounting holes with a #80 drill bit in my pin vise. I also removed the cast long hood access door handles. These will be replaced with etched door handles later on in the build.
I noticed that the model is actually missing a door handle on the access door next to the cab door on the fireman’s side. I located the spot where the handle should be placed and drilled a #80 mounting hole for that door handle as well as all of the other door handles.

ABOVE: Proper weathering, paint and details make an ordinary out-of-the-box model turn into something unique.
Something that became apparent after I had stripped the paint was that there was a noticeable amount of glue used to mount items like the handrails or grab irons. I chipped away the glue and the trapped paint with my X-acto knife.
After all of the detail was removed I started on removing the intake screen and doors. I drilled holes all around the inside of the front radiator intake screen. I was replacing the screen with an etched screen from KV Models to enhance the appearance of the front end.
After the holes were drilled I used a sharp X-acto knife to slice from hole to hole and remove the plastic screen. I smoothed the inside edge of the opening with sanding sticks and files. I also removed the cast bolts and lip around the opening. The etched screen mounts directly to this area and has that detail on it. The same procedure goes for the cab doors. I always try to open the cab doors whenever possible to give the model a used appearance. It also opens up the cab to better show the interior detailing within the cab. In addition to the cab doors I wanted to model the cab windows in the opened position. I carefully sliced the cab window frames from the model, leaving the rectangular opening intact…
