

 By Don Janes/photos by the author
My Vermont-based Green Mountain Division is a proto-freelanced layout featuring actual towns along the Central Vermont, Boston & Maine, and Rutland railroads. All the towns feature an actual model of the prototype depot located there and a few local structures, but for the most part the structures are freelanced to fit the space.
Vermont has long been a source of fresh milk for large cities in the Northeast, so it only seemed fitting to add a creamery to my Waterbury scene. There had been a creamery in Waterbury but I couldn’t find enough information to build a model of it, so I decided to build my own rendition of a creamery that might have been there. I had originally planned to use a shallow background flat and place it against the backdrop, so I started searching for possible candidates to fit the bill. I decided on Calamus Milling from FOS Scale Models (no. 024). It has a nice-looking gambrel (barn style) roof that is similar to photos I have seen of the creamery at Enosburg Falls, Vt., on Central Vermont’s Richford Branch.
The structure is quite large and was well-suited for the space I had available, but when I put the front and side pieces in the location it just looked too shallow and was too far from the siding which was in place (and already serving another industry).
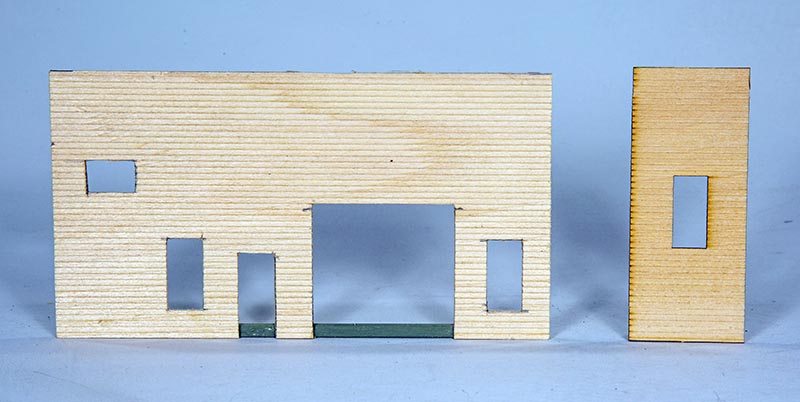
ABOVE: The original short wall section that came with the kit is shown on the right. The author made new, larger pieces (left) to build out the full-size structure.
I had two choices: build an un-realistically wide loading dock to meet the tracks, or expand the structure into a full-size building. I chose the latter. I looked through my stock of wood siding and found a large sheet of clapboard siding that matched the board spacing on the kit walls perfectly so I decided to go with that.
My next issue was to find windows that matched those in the kit. Fortunately, most kit manufacturers use Tichy Train Group window and door castings. Many years ago I purchased two boxes of assorted Tichy window and door castings just to have extra on hand and, as luck would have it, I found all the windows and doors I needed in those two boxes. Sometimes it pays to stock up on extra parts for a rainy day. I can’t list the exact part numbers as they are just in a box all mixed up. With all the required parts on hand I set about designing and building my new creamery.
Preparing The Main Wall Sections
The first thing I did was make a cardboard mock-up of the full-size structure, copying the front wall and making new side walls to determine the exact size I would need. I wanted the back of the structure to be just about at the backdrop.
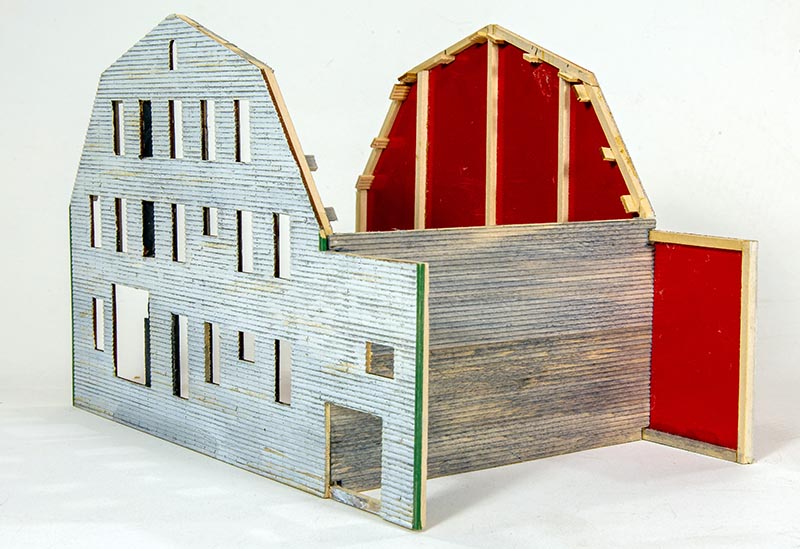
ABOVE: The main wall sections are glued together and plenty of bracing was added to prevent warping.
Once I established the exact size I needed for the side walls I transferred the dimensions to the clapboard siding to make the new walls. Since the rear wall would be blank, I traced the outline of the front wall onto a piece of heavy card stock.
Next, I determined where I wanted to place the new windows and doors on the sides, matching them up with the height of the front windows. I decided that the right side with the extension would be an office and warehouse area with large doors for trucks to back inside, and a large door at the front at ground level for moving cans and equipment in and out of the building.
Once I had all the door and window locations cut out for the outside walls I started to add 1/8” square basswood bracing to all the walls to give the structure rigidity. Wood can easily start to warp when glue and paint are applied if the walls are not properly braced. Since this was a large structure, I needed a lot of bracing. I cut and glued the bracing to each section and placed them under a heavy steel plate on my table saw bed until the glue was fully dry…