
by Jack Burgess/photos by the author
While there are a number of ready-to-run freight cars available these days, a lot of steam era modelers rely on resin freight car kits to accurately complete their equipment rosters. These kits require a few additional tools beyond basic hand tools. They include a pin vise and a set of small drill bits, needlenose pliers, files, clamps and an airbrush. Given the “mixed media” used in these kits, such as brass stirrup steps and grab irons, resin kit modelers might also start thinking about purchasing a sandblaster.
A sandblaster can easily prep brass parts and trucks for painting, especially important when painting with acrylic paints. A sandblaster can also be essential prior to painting when modifying or superdetailing older brass locomotives. Although I have never tried it, reportedly using a very mild abrasive such as baking soda with a sandblaster at a low p.s.i. can also remove lettering on ready-to-run freight cars without damaging the underlying paint. It can also have weathering uses.
Back in the 1980’s I bought a Paasche AEC sandblaster and, while it worked well when it worked, I had problems getting it to continually operate satisfactorily. I subsequently gave up on sandblasting after that. A couple of years ago I purchased a fairly standard, self-contained benchtop cabinet sandblaster for large projects; it also included a “pencil” sandblaster. That pencil sandblaster turned out to be perfect for modeling projects. For a time I used this pencil sandblaster outdoors, but that resulted in a lot of abrasive on my hands and arms, especially when the wind was blowing, The process begged for a better solution.
Many years ago someone on the Steam Era Freight Car Yahoo! email list posted some photos of a home built sandblasting booth online. When I was finally ready to build my own sandblasting booth those photos had been removed. My booth follows many of the general ideas posted by this chat list member, and I thank him for his ideas and inspiration.
Building the booth
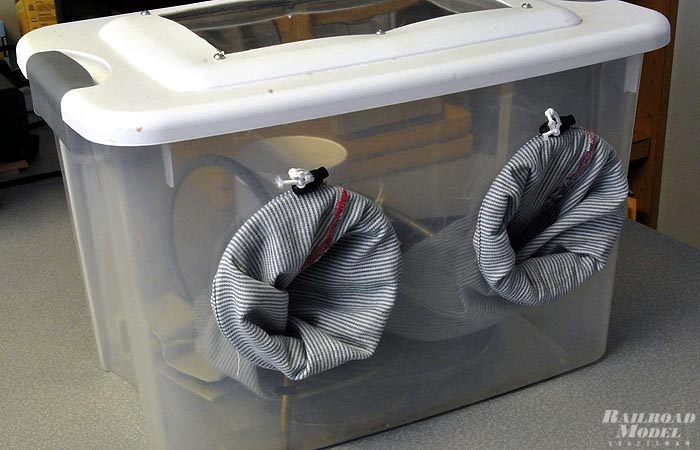
I started my project to build a suitable booth with a 12″×18″×12″ high plastic storage box from my local hardware store. Mine was marketed by Sterilite, although there are many other sources. Besides the general size, I was also looking for a storage box with a tight-fitting lid with clips on both ends to hold the lid relatively tightly to the box, rather than a lid designed to simply drop into a groove around the perimeter of the box.
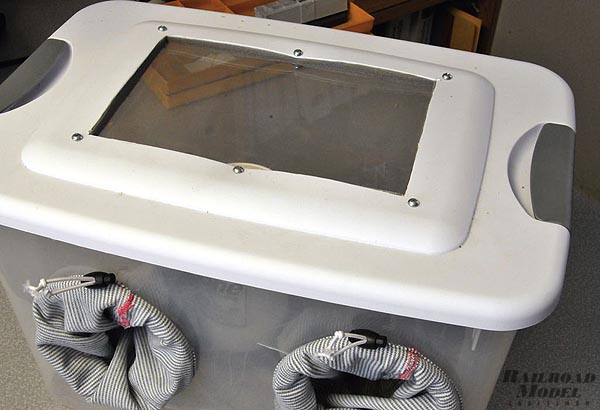
My first task was to add a “viewport” in the lid of the box since it was frosted plastic. I cut a 6″×9″ opening in the lid with a box cutter, then covered it with a 7″×10″ sheet of .125″ sheet acrylic screwed to the inside of the lid with quarter-inch-thick weather stripping foam tape between the lid and the acrylic to seal the opening.
I next cut a pair of 4.25″ diameter holes (8″ center to center) in the front of the box for my arms. I first checked the diameter by cutting a hole in a piece of scrap cardboard to make sure they were large enough for easy access to the box.
My wife Jacque then cut the sleeves off of an old “railroad motif” shirt (just a coincidence to the project) and added a hem to the “hand” ends of each sleeve. Elastic cord was fed through the hems, and the ends were captured by cord locks from a fabric store. The elastic cord and locks allow me to close the ends enough to prevent blown abrasive from entering the sleeves while still letting me get my hands into the box.
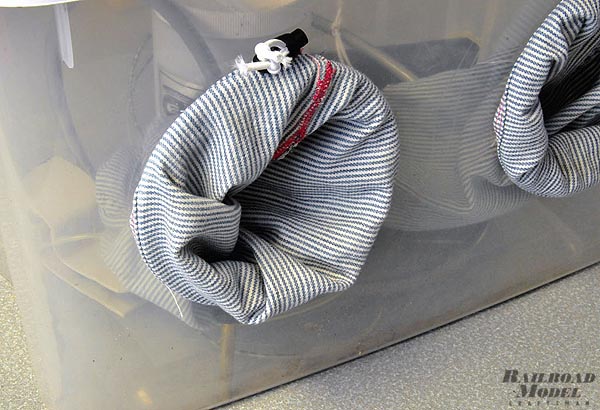
I next cut a pair of rings from .125″ hobby plywood to use to attach the large ends of the sleeves to the box. The holes in these rings are the same size as the holes in the box; the outside diameter is around one inch larger. My original thought was to glue the upper ends of the sleeves to the plywood rings, which could then be screwed to the outside of the box to hold the sleeves in place. Instead, my wife and I decided to add hems to the upper ends of the sleeves along with some elastic cord and cord locks similar to the other ends of the sleeves. The wood rings were loosely attached to the box with four half-inch long screws and nuts, and the upper ends of the sleeves were stretched over the wood rings. Tightening the screws locked the sleeves in place.
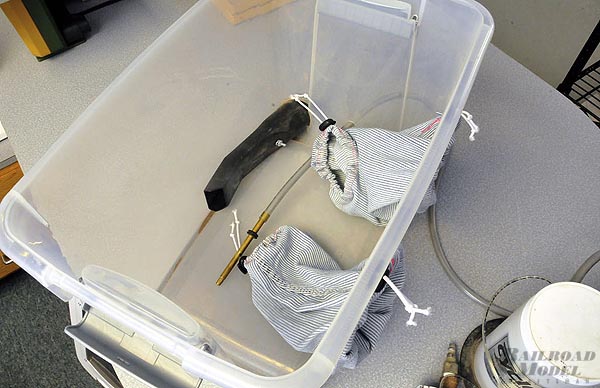
Since I’m right-handed, I drilled a hole near the bottom of the box on the right side for the hose attached to my pencil sandblaster. Even though the pencil sandblaster utilizes a small amount of air, I felt I should include a way to let air get out of the booth while I was sandblasting. Although air could simply leak out of the “sleeves” while sandblasting, that might also mean abrasive dust was also leaking out. If you want to recycle the abrasive, a simple opening equipped with some sort of air filter could be added to the box. However, I was more concerned about controlling dust from the box and making sure that visibility of the item being sandblasted wasn’t being compromised by dust in the booth, so I added a connection for my shop vacuum to the back right corner using a utility vacuum nozzle.
After cutting a hole for the nozzle, I bolted it to the back of the box and patched the entrance hole with construction adhesive. If you want to recycle the abrasive, you might think about installing the outlet high in the box. That might keep the air clear (so that you can see your progress) while also not pulling the abrasive out of the box.
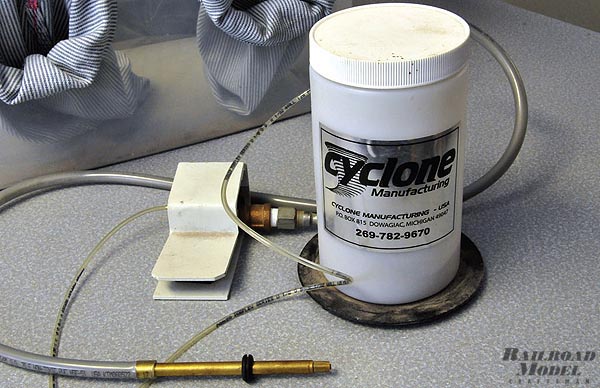
Sandblaster and other equipment
My pencil sandblaster is a Model BB100 Bottle Blaster purchased from the Cyclone Manufacturing Company. These they cost around $90.00 to $120.00 from online distributors. In addition to the sandblaster, you will need an air compressor which puts out 80 to 90 p.s.i.
The pencil sandblaster is mechanically very simple, pulling abrasive directly from a refillable 20-ounce container of abrasive. It took me a little while to figure out that the hole in the brass tube/handle had to be covered for the sandblaster to work. A rubber grommet is provided to cover the hole, or you can use a fingertip and manually adjust the output flow. The latter option might be worth considering if you bypass the foot-operated air valve. I fitted my air valve with a quick-coupler to make it simple to connect it to the hose on my air compressor.
I use Paasche Air Eraser Compound (AEX-5) for my sandblasting. It is an aluminum oxide material. I have found that it works fine on brass, but softer abrasives are also available. Paasche sells sandblasting compounds directly from their web site, under Etching and Striping Tools. Using the outfit is fairly simple. I wear latex gloves (available from Costco in 150-count boxes) while sandblasting and hold the model in one hand and the sandblaster in the other, keeping the tip about a quarter-inch or so from the part being prepped.
Keep the sandblaster moving just like when airbrushing and watch your progress. Only one or two passes are needed to completely prepare a part. Sandblasting is a great way to clean and give metal parts some “tooth” prior to painting. This sandblasting booth makes this an quick and easy process.