
 By Scott Thornton/photos by the author
Model railroaders dream of the day when they can get operations started on their layouts. But before the enjoyment of seeing trains run, getting the layout space prepared and the benchwork up is the top priority. Model railroads need robust benchwork to not only support the trains but also the scenery, fascia, wiring and control mechanisms, backdrop, valance, and any other features.
One important requirement of the benchwork on my Iowa Interstate Milan Branch was that it needed to share space with storage shelves under the layout. With a layout height of 54 inches and a depth of 24 inches, I had plenty of space to install prefabricated storage shelves under the layout to keep a variety of household items and modeling supplies. After the shelving went in, I had a friend suggest that a good option to support the layout was to use 1½-inch angle iron welded into “C” shaped brackets. This was a novel approach as I had never seen anyone use steel brackets for layout construction before. I was surprised to find the cost to weld and paint the brackets was very reasonable — $12 each and I only needed 12 brackets to cover 40 linear feet of layout. Since the walls were cinder block, I used self-tapping concrete screws to install the brackets.
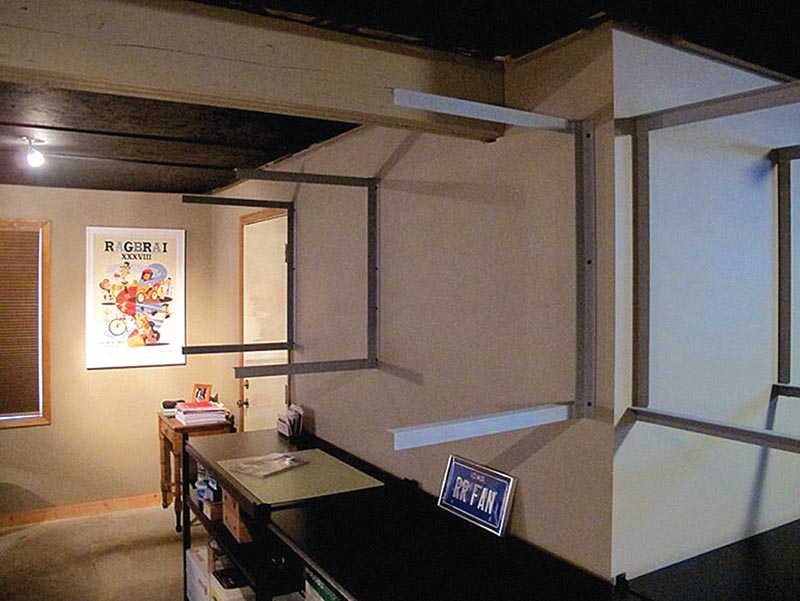
ABOVE: These steel brackets were custom-made by a local welder to support the benchwork for the Milan Branch. The layout will have to share space with the author’s home office.
The Milan Branch is a relatively flat branch line that travels through two metro areas. The only significant elevation change is where the line crosses the Rock River in two different locations. Because of this, I decided to build the benchwork level using ¾-inch plywood with ½-inch Homasote glued and screwed on top. An area approximately 3½ feet wide was lowered where the river scene was located.
The combination of sturdy plywood and Homasote has proven very effective at keeping sound deadened as the Homasote does a great job of absorbing train movements and any ambient noise. I keep the temperature and humidity constant in the room, and in the nine years since starting the layout I’ve had no noticeable movement in the Homasote.
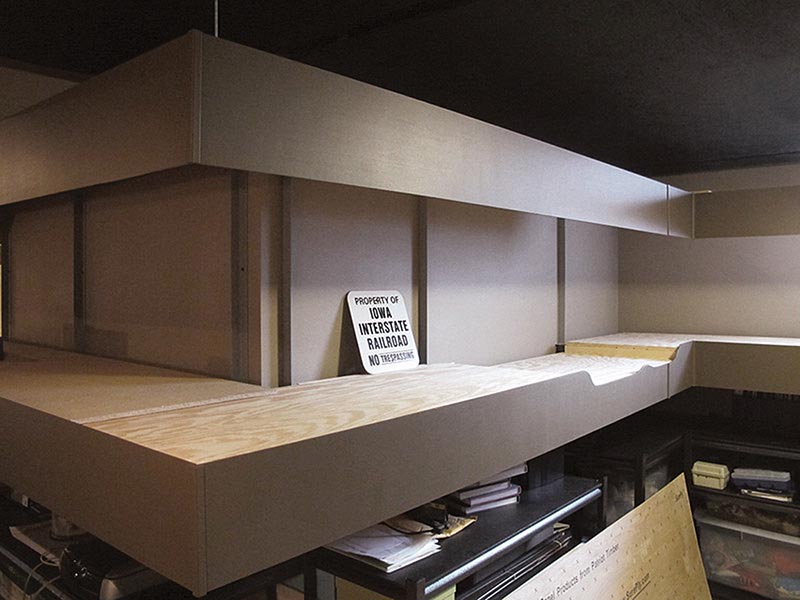
ABOVE: Benchwork has been installed and fascia and valance has been hung. While the scenery is mostly flat, an area 3.5 feet wide was lowered to represent the Rock River crossing.
Sound is very important to me, including both train operation and regional ambient sound. Besides the engine sound, I plan to include ambient sound in specific spots as well as triggered random flange squeal. Because of this, using sound-absorbing materials when building benchwork and completing the room was a necessity.
I built an enclosed valance and front fascia. For this I used an underlayment product called SurePly made by Patriot Timber that I found at my local Lowe’s. This product proved very versatile as it’s strong yet flexible. I cut the valance and fascia to approximately nine inches in height so that I had a nice, uniform look both above and below, and then reinforced the panels with 90-degree wedges glued to the benchwork…
