
by George Riley /photos by the author
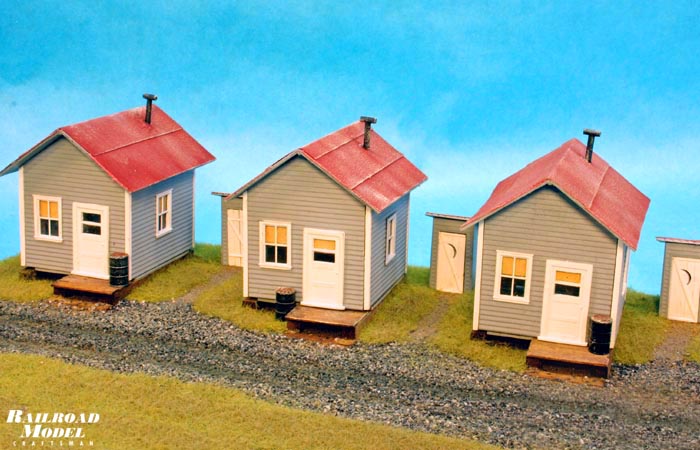
Recently I assembled a Alpine Division Scale Models’ Chilao Flats Cabin Kit (#5806). This project yielded three identical cabins that are being used to house migrant labor on a current HO scale layout. This basic kit with a few additional items could easily be modified to construct a whole range of unique structures using the part provided in the kit as a starting point. Additionally, most of these variations could be constructed inexpensively with a minimum of purchased parts. So far from two additional kits I have been able to build five different HO scale buildings. Most of the necessary items were from my scrap box having been left over from other projects.
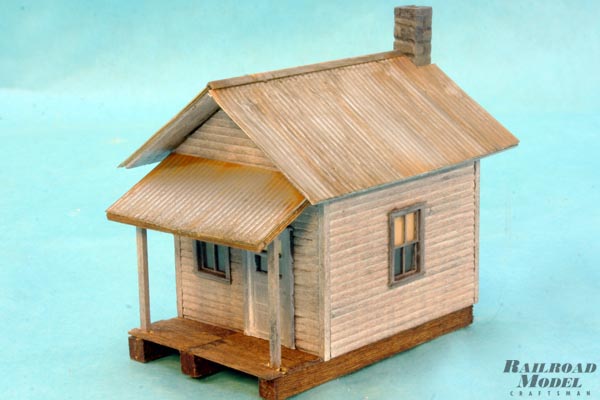
The Old Home Place
This small farm house has a full width covered front porch, stone fire place with chimney and corrugated tin roof added to the basic cabin. These would have been some of the more common improvements made to these cabins by homesteaders looking to put down roots. The distressed finish was done using a white gel pickling stain over MinWax Early American Seal n’ Stain to capture the look of aging paint.
To add the porch three long foundation timbers and planking from the kit were used. 1/16” square basswood was used for the support columns and framing for the porch roof. A small piece of cardstock covered with corrugated siding finished off the porch.
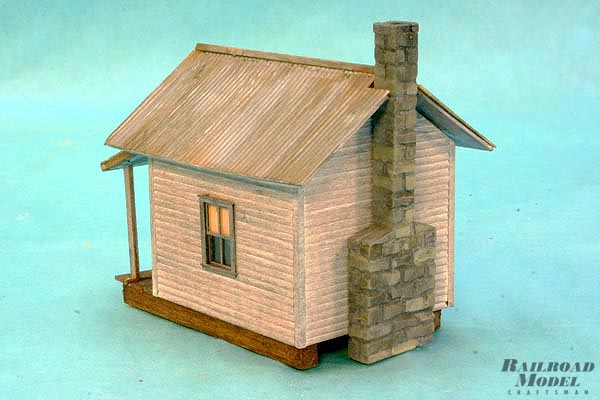
The fire place and chimney was made by gluing two 1” pieces of ¼” square bass wood to either side of a piece of ¼” square bass wood cut to length to clear the rear eave of the roof. Once the glue had dried random stones were scribed in to the chimney assembly with a wood burning pen. The chimney was then sealed with sanding sealer and primed with gray spray primer. Individual stones were highlighted using acrylic craft paint over which a dark wash was applied. The roofing at the rear peak was notched and the finished assembly was glued to the rear wall of the cabin.
Corrugated cardstock was cut to size before being given a coat of Steel Hammered Metal spray paint. Once dry the painted corrugated material was glued over the card roof provided in the kit. A light weathering of Paynes Gray and rust finished off the roof. Bass wood or styrene angle stock forms the roof cap.
Additional Materials Needed:
1/16” square bass wood about 6” long for the front porch
¼’ square bass wood about 6” long for the fireplace and chimney
Light cardstock about 2” x 1” for the porch roof
Corrugated siding enough to cover the main and porch roofs
Bass wood or styrene angle about 3” for the roof cap
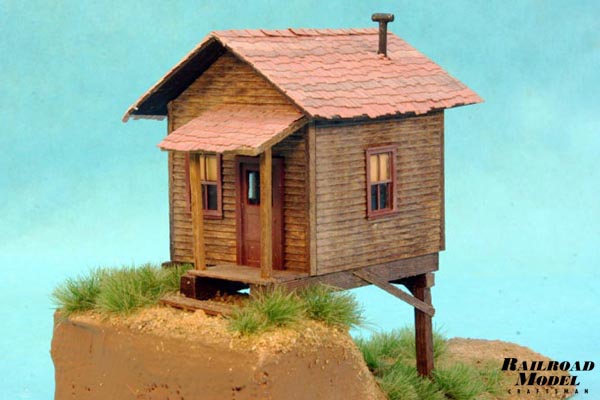
Hill Side Cabin
Usually our models a built to be placed on a flat surface, rarely do we even add a foundation that drops below the level of our base scenery. The inspiration of this structure came from a recent visit to Paul Scoles’ home layout. He had constructed a complete town that hugged the side of a mountain. The small cabins on the down grade side hugged the dirt “Main Street” with their back sides hanging over the edge supported by pilings of dubious integrity.

This cabin was stained and left unpainted before being assembled more or less per Alpine’s instructions. A small roof supported by 1/16” basswood strip was added over the narrow front porch and the roof was covered with some laser cut shingles left over from another project. If you don’t have enough shingles in your scrap box, Bar Mills, RS Laser, Side Track Laser, or Campbell Scale Models to name but a few vendors have aftermarket shingles available.
To level the cabin on the hill side, a U-frame of 1/8” square bass wood strip reinforced in the corners with some random strip wood was built and glued to the foundation timbers under the rear of the building.
Additional Materials Needed:
1/16” square bass wood about 6” long for the front porch
1/8’ square bass wood about 6” long for the building supports
Random strip wood about 2” or 3” to reinforce the supports
Light cardstock about 1” x 1” for the porch roof
Laser or roll shingles enough to cover the main and porch roofs
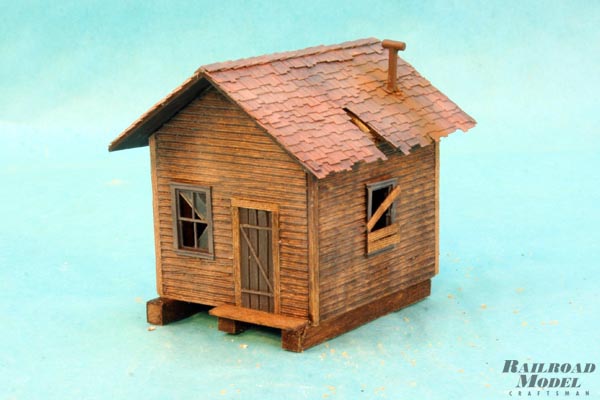
The Abandoned Cabin
All too often one finds derelict cabins lying abandoned along the railroad right of way. These relics of the past often are surrounded with rusting vehicles as well as pieces of machinery and house hold implements no longer are of use. A model of one of these dilapidated structures surrounded by their attendant refuse can be a real focal point on a model railroad layout.
All the wood parts were stained with the plastic windows and door painted a flat dark brown before assembling the cabin per the kit instructions. Some of the window mullions were cut out before being boarded up with stained scraps of random strip wood. In the windows where some glazing remained, the clear plastic was scored and broken to replicate broken glass. The front stoop was represented with loose, cracked and weathered boards form the kit.
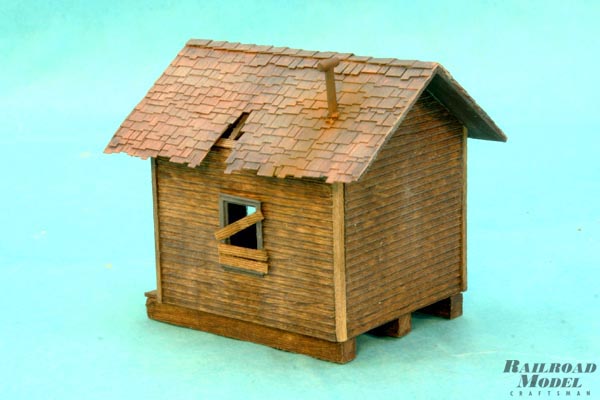
A couple of random holes were cut in the cardstock roof with 1/16” square and random strip wood glued to the underside to represent exposed rafters. Laser cut shingles were then applied to the roof making certain to leave the expose holes open. Final weathering with an overall dark wash was applied to the building before a light gray dry brushed coat of craft paint was used to accent the highlights.
Additional Materials Needed:
1/16” square bass wood about 3” long for the exposed rafters
Random strip wood about 6” for rafters & to board up the windows
Laser or roll shingles enough to cover the roof
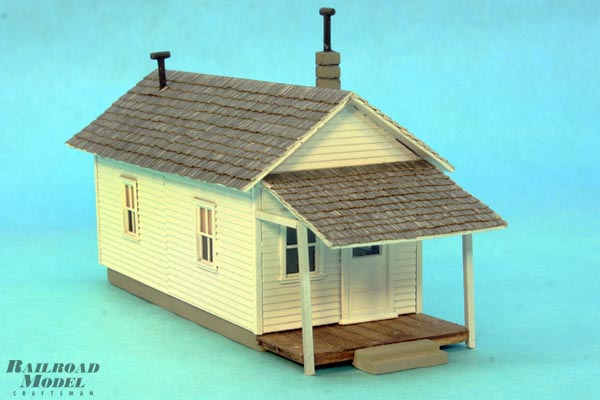
Mrs. Remington’s Shotgun House
The long narrow shotgun house once was a common sight in rural America. Most were home built of what ever local materials were both available and cheap. Mrs. Remington’s is inspired by a home located along US 460 in Blue Ridge, Virginia. Unlike most remaining examples it is neat well kept.
This model is simply built by adding the front and two sides from a second cabin in line to the rear of the first. This provides both a front and rear door to the house which is missing from the previous models. A new cardstock roof is cut to cover the entire length of the structure. A new “cement” foundation made of 3/16” thick basswood cut to size, sealed, primed and painted replaces the timber foundation supplied in the kit.
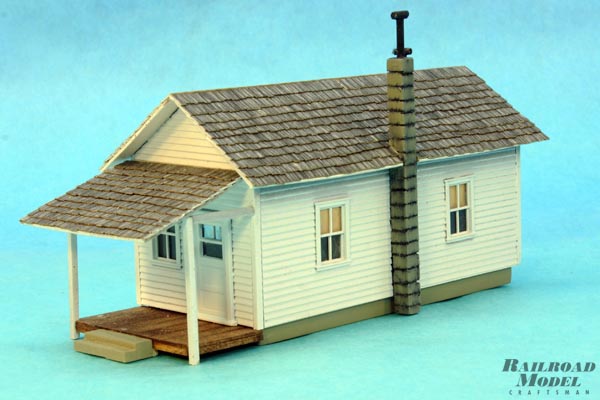
The full with front porch is framed from 1/16” square basswood and covered with planking from the kit. The porch floor was stained, however it could have been painted. The porch roof was made with cardstock supported with 1/16” square basswood. Steps up to the porch and back door were made from 1/8” and 1/16”square basswood glued up and painted with Floquil concrete paint
A “cinder block” chimney made from 3/16” square basswood scored and painted was added to one side of the house to hide the seam between the joined sides. The final step involved applying shingles to the main and porch roof.
Additional Materials Needed:
1/16” square bass wood about 6” long for the front porch
3/16” square bass wood about 6” long for the chimney
1/8” square bass wood about 2” long for steps
Light cardstock about 3” x 6” for the main and porch roof
Laser or roll shingles enough to cover the main and porch roofs
3/16” thick bass wood about 3” by 5” for the foundation
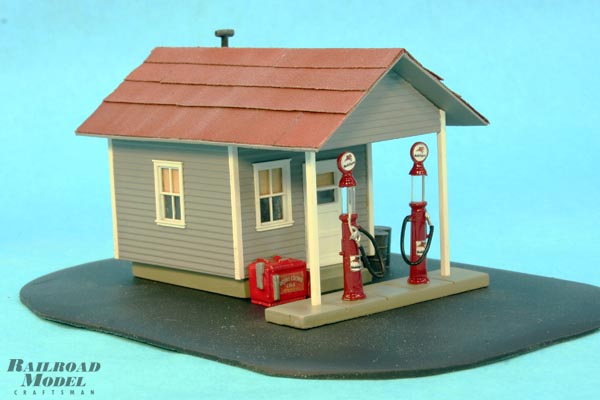
Crossroads Gas
Dispensing fuel to travelers and local farmers alike the rural gas station was an icon of a simpler life. This precursor to our modern convenience store this “mom n’ pop” business always had a drink box full of ice cold pop and a counter cluttered with Moon Pies, pickled eggs and other snacks. Locals would frequently stop in for a hot dog as well a tank of gas.
Crossroads Gas involved cutting a new roof from card stock with a front over hang. The open gable of the new roof was closed in with the peaked back wall left over from building Mrs. Remington’s house. Painted sand paper provided in the kit was cut into ½” strips before being glued to the cardstock roof. 1/16” square basswood was used for supports for the over hang.

The building rests on a “concrete” foundation cut from 3/16” basswood with steps cut from 1/8” square stock. A platform for the pumps was cut from painted and scored 1/8” thick cardstock. Pre-painted gas pumps and a drink box from JL Innovations were added to complete the model.
Additional Materials Needed:
1/16” square bass wood about 6” long for the front roof over hang
1/8” square bass wood about 1” long for steps
Light cardstock about 3” x 6” for the roof
1/8” thick cardstock about 1” x 3” for the pump platform
3/16” thick bass wood about 2” by 3” for the foundation
Era specific gas pumps (2 will fit on the island)
Drink Box/Soda Cooler/Vending Machine
55-gallon Oil Drums
These five easy projects made use of a readily available inexpensive kit for their basis. Only a few additional items were added to change the character and use of each model. Most of these parts came from the scrap box or were inexpensively purchased from a craft or hobby shop. Hopefully we have given you some ideas for some simple one-evening projects of your own.
