

 by Andrew Castle/photos by the author
Chartered in 1889, Algoma Central Railway built north from Sault Ste. Marie into the Ontario wilderness to haul timber and iron ore. It was acquired by Wisconsin Central in 1995, which in turn was acquired by Canadian National in 2001. In 2021, the railway was acquired by short line operator Watco.
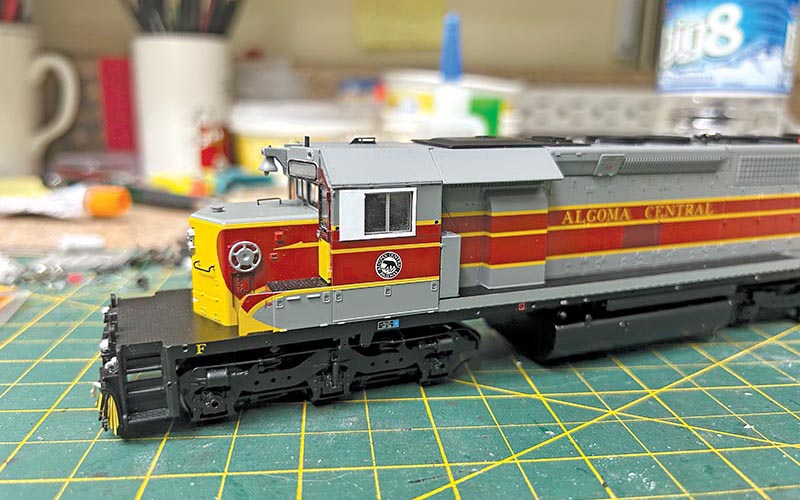
In 1973, Algoma Central received six SD40-2 locomotives from Electro-Motive Division (EMD) Canadian subsidiary General Motors Diesel (GMD) wearing standard ACR paint that had an obvious Erie Lackawanna influence. When ACR was purchased by Wisconsin Central in February 1995, their locomotive fleet was renumbered, patched, and WC logos were applied to the hood ends. Over time the SD40-2s received WC-style all-weather windows and the Canadian straight-up corner steps were replaced with American-style angled steps. WC replaced the cab doors on many of their locomotives with a thicker style; WC 6002 received new WC-painted doors several years before the entire unit was repainted around 1998.
When Bowser produced its HO scale GMD SD40-2 decorated for Algoma Central, I couldn’t resist buying one to patch for WC. This project was made easier when Switchline Decals released decals specifically for these units.

Since locomotives are often modified over time and sometimes in stages, it helps to have photos of the unit you want to model during a set time period. I chose to model WC 6002 after it received the new maroon and gold cab doors but before the corner steps were rebuilt. A study of photos shows each former Algoma Central SD40-2 developed its own “personality” of patches, stencils, rebuilt components, and worn paint between 1995 and the time it was completely repainted.
This model started as a simple patch and weathering job, but as I looked at the model I found several other components I wanted to upgrade. You can pick and choose which steps you want to follow depending on how you want your model to look when finished.
Disassembly
The Bowser model is beautifully designed and with a bit of patience can be disassembled into smaller assemblies that are easier to work with. I removed the Phillips screws holding the coupler boxes on and slid the coupler boxes out through the pilot. I lifted the shell straight up off the chassis. There are wires running between the ditch lights and chassis, which have a plug near the front of the chassis secured by a piece of tape. I peeled back the tape and unplugged the wires, allowing the shell to separate from chassis.
I removed the handrails by carefully pulling out each stanchion with my fingers. Some stanchions needed a bit of assistance by sliding a #11 hobby knife blade underneath and twisting to slide out the mounting pin. The drop steps on the ends come off with the end handrails.
I wanted to remove the cab from the shell to make it easier to modify the cab; if you choose to leave the cab alone you can skip the next steps. The snowshields and top of the inertial filter pop off. I used a small flat screwdriver to help release the tabs that lock the hood and cab onto the walkway/pilot assembly. The cab can be slid up off the hood by removing the grab iron on the right side of the short hood then spreading the sides of the cab apart and moving it upwards. Light tubes going from inside the long hood to the classification lights also interfere, I removed the black plastic light shield inside the hood just behind the cab, then removed the small round light tubes with a pair of tweezer-nose pliers.
Once the cab is removed from the hoods the interior can be removed by spreading apart the sides of the cab. I tried removing the windshield wipers; unfortunately I broke off several of the mounting pins while doing this so I discarded all of them.
I shaved the glue off the snowplow mounting pins on the back side of the pilot, then pried the plow off the pilot to make it easier to add Details West scale coupler buffer plates.
Modifications
The prototype Algoma Central units were delivered with the horn mounted in a recess on the top of the numberboard area. I twisted and pulled the horn casting to remove it, popped off the bell casting, then removed the whole numberboard assembly from the front of the cab by applying a bit of force with my fingers. I found the horn, antenna, and bell to be a bit undersized so I replaced those parts later in the process. I slid a knife blade behind the numberboard “glass” and popped both out. I plugged the horn mounting hole with styrene rod.

I used a knife and file to carve a square notch in the top of the numberboard assembly, then glued it back in place on the cab front. I didn’t have exact measurements so I estimated the size from photos. I drilled a hole between the numberboards and mounted a Miniatures by Eric B2 bell. I used a brush to paint the notch area and bell with Vallejo Model Air 71.277 Dark Gull Grey, an almost exact match to the Bowser grey paint.
The WC plated over the louvers on the front of the cab on the engineer’s side. I simulated this by cutting a piece of .005” styrene sheet to an appropriate size, painted it with Tamiya Grey Fine Surface Primer, and glued it in place.
The WC put new cab doors on many of its locomotives which extended slightly from the cab front instead of sitting flush. I made new doors from .020” styrene sheet to match the dimensions of the Bowser cab doors but did not cut out the window openings. I removed the Bowser windows from the original doors, glued the new doors in place over top with CA, then cut and filed the window openings to match the Bowser opening. I made door handles by gluing a small square of .010” styrene in place, then drilling for a handle made from Tichy wire. I made door hinges with bits of styrene strip. I masked the cab and painted the new doors with Modelflex WC Maroon, then applied gold stripes from Microscale set 87-712. I brush-painted the inner edges of the window openings black. I trimmed the edges of the original cab door windows flush so they would fit the new openings and glued them in place with Microscale Kristal Klear. I made new numberboard inserts from .010” clear styrene cut to size with the corners rounded. Kristal Klear was used to glue these in place as well. I opted for non-operating class lights so I filled those openings with Kristal Klear, and once that dried I painted the class lights dark grey. While I was brush-painting I used a 5/0 brush and Vallejo Model Air Silver to paint the headlight, ditch lights, and brake wheel…
