
 by Christopher D’Amato/photos by the author except as noted
The General Electric 44-tonner, introduced in 1940, was designed for light branchline and industrial work. Its small size and weight made it perfect for many short line rail roads and the Middletown & Unionville, like many other railroads, chose the 44-tonner as a successor to steam power. Dating back to 1868, the Middletown, Unionville & Water Gap Railroad was constructed and leased to the Erie Railroad. The Middletown & Unionville emerged in 1913 when the Erie defaulted on bond interest payments. The M&U was sold at a foreclosure sale on January 15, 1947 to three local feed dealers who reorganized the company as the Middletown & New Jersey Railway. The short line served as a connection between the Erie and the New York, Ontario & Western at its terminal in Middletown, N.Y. The NYO&W shut down in 1957, and the Erie gave way to Erie Lackawanna in 1960 and finally Conrail in 1976. A handful of customers continue to benefit from M&NJ service today, with reliable 44-tonners providing the power.
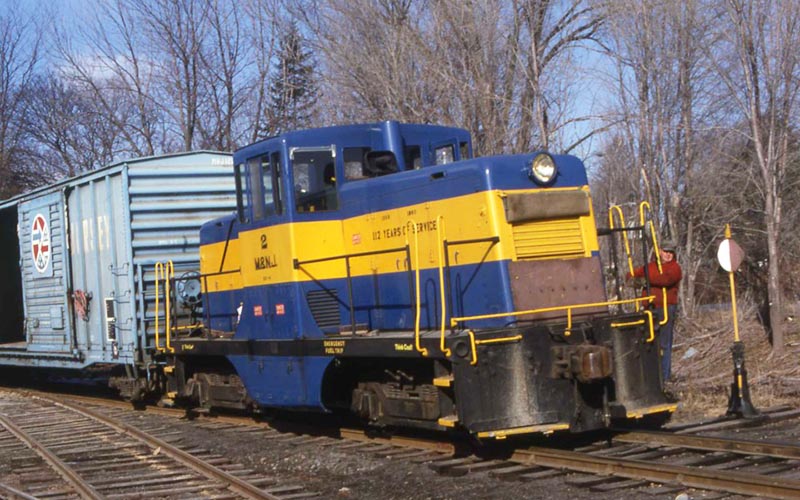
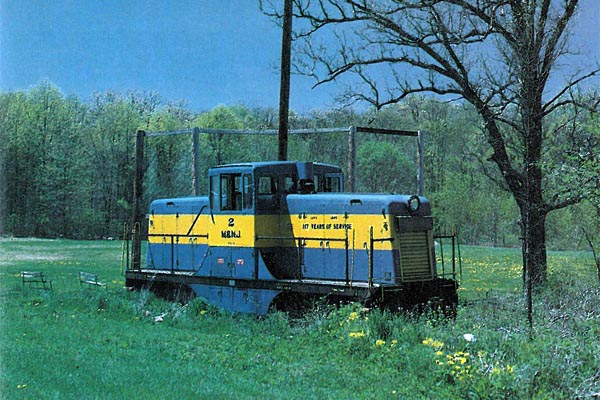
 Middletown & New Jersey No. 2 goes about its business in Middletown, N.Y., on a bright and sunny May 12, 1988. This small short line is a great candidate to model with its small roster of small engines working a handful of customers on a few miles of track.
Almost 400 of these units were built between 1940 and 1956 and over the years changes were made to the body style of the locomotive. (The March/April 1975 and May/June 1975 issues of Extra 2200 South contained an excellent article on the GE 44-tonner that explained and illustrated the many differences in the locomotives.) Luckily, the Bachmann HO model of the 44-tonner (patterned after the former Pennsylvania Railroad unit at Strasburg, Pa.) has the same Phase IV carbody as the M&NJ units. This makes building an accurate M&NJ model relatively easy.
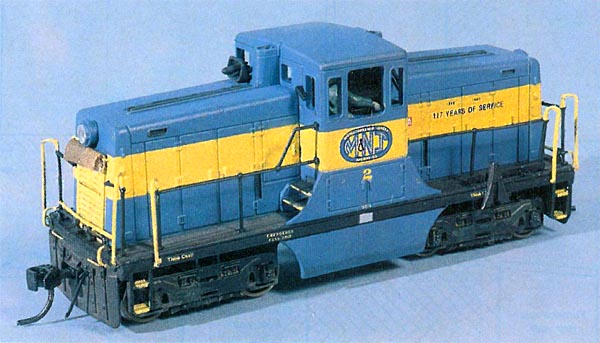
Presently, only one of the M&NJ’s two 44-tonners is in full paint. The No.2, which the railroad purchased in 1963, wears the M&NJ’s current blue and yellow livery. while the No.1 is stored in the shop wearing only a coat of primer. Since the No. 2 is the engine that is currently in use, it is the one that I chose to model.
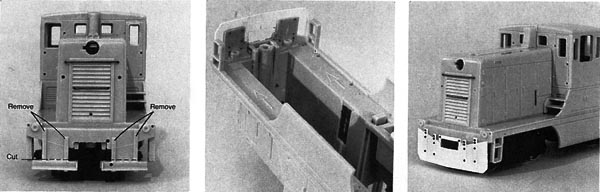 The Bachmann model (left) needs its footboards and the mounting brackets that hold them in place removed. To install Kadee couplers, cut down the coupler mounting lugs and the adjacent tabs even with the coupler opening (center). Use a solvent cement to attach the new pilot (right). The holes for the grab irons and air hose had yet to be drilled when this photo was taken.
Constructing the model
The biggest change that needs to be made to the model is on the pilot. The footboards should be cut off with a razor saw and the bars that held them to the pilot should then be carefully carved away using a hobby knife with a chisel blade. Then sand the pilot smooth with 400-grit sandpaper.
If you plan on replacing the Bachmann couplers with Kadee couplers, remove the coupler mounting lugs and the adjacent plastic tabs by carving them off with a hobby knife. Cut them flush with the pilot opening and file the area smooth.
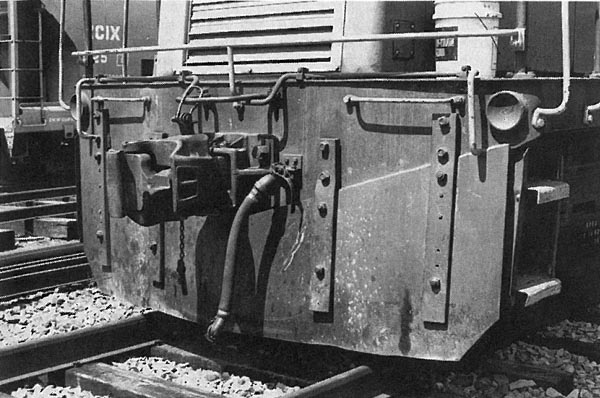 ABOVE: Unlike the No. 1 which came equipped with a plow pilot, the snowplow was added to No. 2 after it was purchased by the railroad. The coupler lift bar arrangement on the No. 2 differs somewhat from the model, as does the railing just above the pilot.
Now the model is ready for the new snowplow pilot. I fashioned mine from .010″ sheet styrene (see drawing) and then used .010”x.040” styrene strips to represent the mounting bars. Be sure to notch out a space in the center of the pilot for the coupler. While on the prototype the pilot drops down below the coupler pocket, on the model the need for a greater swing area for the coupler causes the pocket to fall into the plow area.
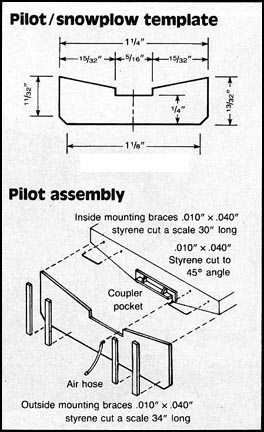 Before installing the pilot on the model, make a light, vertical score down the center of the back of the pilot. This will allow it to bend outwards in the middle slightly when it is attached to the locomotive. Position the pilot about three scale inches below the poling pockets and glue it in place.
Once the pilots are secure, use a pin vise and a small drill bit to make the holes for the nut-bolt-washer castings, air hose and grab irons. Each mounting bar should receive four n.b.w. castings: two above the pilot, one near the top of the pilot and one about six scale inches from the bottom. Line up the outer grab iron holes just above the top of the outer pilot mounting bars. Drill these and then use a grab iron to measure the placement of the other two holes. Attach the n.b.w. castings with solvent, but hold off on cementing the grab irons and air hose in place until after the pilot has been painted. To make the protruding portion of the Kadee coupler housing look more acceptable, a simple coupler pocket can be fashioned out of three .010”x.040” styrene strips framed around the top and sides of each coupler opening. Attach these pieces to the pilot and after they are secure, drill a hole in the top corners and install n.b.w. castings.
Now it is time to install the top plate from the Kadee coupler housing, but before that can be done the back portion of it needs to be trimmed straight across to allow the mechanism to fit inside the body. Cut it so that all that remains behind the center mounting hole is approximately 1/16″. Line up the screw hole on the trimmed piece with the mounting hole in the body, make sure that everything looks straight, and then glue it in place with solvent. To finish off the coupler pocket, simply add two triangular pieces of .010”x.040” styrene between the top trim piece and the top of the Kadee coupler housing. These should be placed about 1/16″ in on each side.
The M&NJ’s No.2 has both a single chime air horn and a Hancock air horn. The Hancock air horn should be placed on the same side of the engine as the single chime horn, but on the opposite hood. To mount it in place you will need to drill a hole approximately 1/8 H from the cab. Drill the hole now, but wait until after the locomotive is painted before installing the Hancock horn. The single chime air horn and the headlight housings can be installed at this point, however, as they will be painted blue.
While there are still a few more details to add, they are better left until after the engine is painted. Also, before painting remove the metal rods that run across the top of the radiators. The radiator covering needs to be added to these rods.
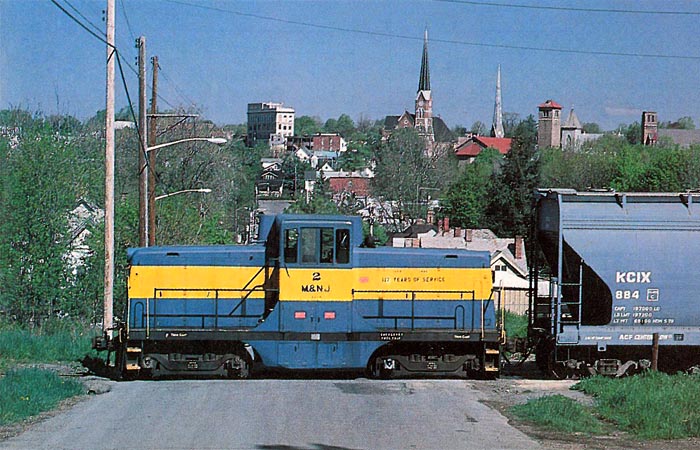
 Posed by the baseball field in Slate Hill, N.Y., M&NJ No. 2 shows off the yellow and blue paint scheme it received in 1980, three years after No. 1 was painted.
Painting
It is a good idea to wash the model in warm water and dish detergent, rinse it and then let it thoroughly dry before doing any painting.
While the prototype is painted with Rustoleum, I opted for the more traditional Floquil for the model. For the yellow use a 25:4 mixture of Reefer yellow and Reefer white. The blue is a combination of D&H blue and Reefer white mixed in a 5:1 ratio. For black I used Floquil Engine black. All of the paint; except for the green used on the interior of the cab, was applied with a Badger model 350 airbrush and was thinned with an equal mixture of paint, glaze and thinner.
I began painting by carefully brushing Floquil Dark Green on the inside of the cab. This can be done with the airbrush, but since the area was so small and hard to see I decided it didn’t warrant dirtying and then having to clean the airbrush.
The body and cab were painted as two separate pieces, but they could be done assembled if you choose. Either way, be sure to mask off the inside of the cab so the chairs and control stand don’t get painted. Also mask the inside of the headlights.
Although the new Microscale Middletown & Unionville and Middletown & New Jersey decal set comes with yellow stripes, I chose to paint mine on. To do this, apply the yellow to the sides and ends first. Be patient, as it will take at least a few coats to cover the gray plastic. Let each coat dry thoroughly before applying the next.
After the final coat of yellow has dried, it is time to mask the stripe. Cut a strip of masking tape just wide enough to cover the area between the middle of the top door hinges and the bottom of the door handles. Make sure that the piece is long enough to go around the entire engine. The radiator grilles at each end and the trim edge around them also needs to be masked off. Carefully apply the tape, making sure that it is straight and that there are no gaps where the blue paint can get through. A little extra time on this step will be well worth the effort.
 Once the tape is in place, spray the entire locomotive body blue. When the blue has dried, the masking can be removed if you want to check your work before moving on. If the masking tape was tight on the body, there should be a clean crisp yellow stripe on the engine.
The black is the final color to be added. Mask off the entire body except for the walkways, frame and pilot. Airbrush these black. Also paint the Hancock air horn black. When the paint is dry, remove the masking and you now have a 44-tonner in M&NJ paint.
Final details
With the engine painted, the Hancock air horn can be cemented in place along with the lenses for the headlights and the windshield wipers. Cement the grab irons and air hoses in place on the pilots and paint the engineer and install him also.
The Kadee couplers can also be installed at this point. Remember to trim off the back of the coupler box to match the top piece that is already installed on the locomotive body. If you have a problem keeping the spring in place in the coupler, you can add a tiny drop of cement to one end of the spring and glue it to the coupler.
To make the radiator covers, which I am told are actually rug remnants, cut a piece of a baby wipe or similar towelette the width of the metal rod that fits across the top of the radiator. Glue one end of it to the rod. After the glue dries, paint the material a dark tan and while the paint is still wet, wrap it around the rod a couple of times. Spread a drop of white glue on the inside of the end and squeeze it with a tweezers to the rod. The metal bar and cover can now be reinstalled on the locomotive and the exposed part of the rod painted yellow. Next, add the handrails and paint them using the photos as a guide. Also, brush on yellow on the grab irons, frame steps and on the edges of the cab steps.
The rerailer hangs off of a bar attached to the handrails on the side of the cab lacking the battery box doors. Use a .010”x.060” styrene strip to make the bar. The two hooks for holding the rerailer frogs can be fashioned out of small pieces of .010”x.040” styrene softened with solvent and bent into a J-shape. Glue these in place and attach a rerailer frog to the hook closest to the cab with a dab of cement.
 Paint the whole thing black. The model is now ready for the Microscale decals. Check the photos for their proper placement. The side of the engine with the battery boxes gets the 2 and the M&NJ. The other side gets the herald. After applying the decals, use plenty of setting solution to get them to snug down and to get rid of the sheen. Add some weathering to the radiator vents and exhaust stacks on the roof by lightly brushing them with Floquil Weathered black.
To add some rust to the pilot, trucks and rerailing frog, I used a new product to the model railroad field called Rust-all by the Kuras Design Group. This is simply brushed on and allowed to dry. It leaves behind a light, random rust pattern. I also brushed their Dust on the pilot, walkway and trucks. A little Floquil Mud on the trucks rounded out the weathering process.
Give the engine a coat of Floquil flat finish, add the cab windows and you’ve got a unique HO scale model ready to go to work on your local short line operation.
UPDATE: Since 1989, the Middletown & New Jersey has gone through periods of decline and rebirth. Online customers closed through the 1980s and 1990s, and the portion of the railroad to Slate Hill was abandoned in 2007. The railroad was sold to holding company Chartwell International in 2005, who in turn sold the line to Regional Rail, LLC in 2009. Thanks to an aggressive rehabilitation and marketing program, business is growing. Starting in 2010, the M&NJ began leasing and operating the Walden and Maybrook Industrial tracks and a portion of the Hudson Secondary from Campbell Hall to Warwich from Norfolk Southern. The trademark 44-tonners have since been retired.
