 By Scott Kuhn/photos as noted
In 2012, Canadian Pacific Railway (CP) began a program to take its existing SD40–2 locomotives and convert them into ECO units. These units provide lower fuel consumption and improved reliability over the older 645-based EMD locomotives. The locomotives all received new 12-710G3A prime movers that maintain the 3,000-horsepower rating of the original SD40–2 from 12 cylinders instead of the original 16 cylinders. These new ECO locomotives yield a 15–20 percent reduction in fuel consumption and emit reduced emissions that now meet EPA’s Tier 0+ emissions standards.
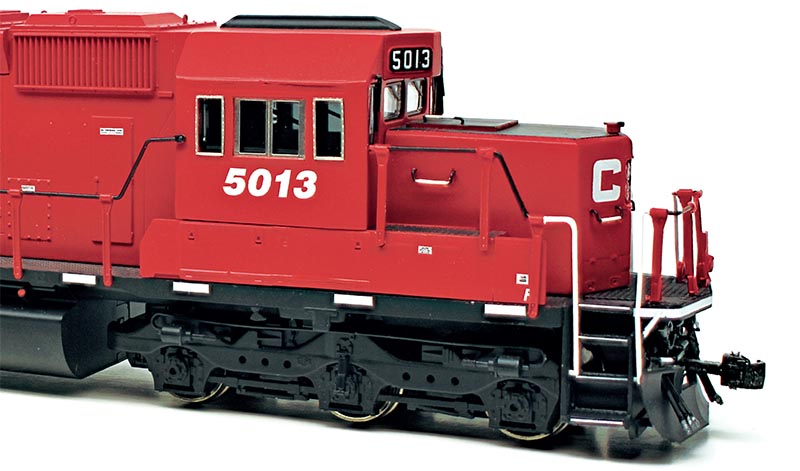
CP’s first order of SD30CECOs was for 20 locomotives numbered 5000–5019. CP sent retired SD40–2s to EMD/Progress Rail’s Mayfield, Ky., plant for the rebuild program. EMD used the frame, trucks, and some internal components from the retired SD40–2s for this rebuild. The cab and fuel tank were built by EMD to meet current crash-worthiness standards, giving the SD30 the “C” designation.
The first batch of 20 SD30CECOs was completed by January 2014. In January 2015, Canadian Pacific ordered an additional 30 units numbered 5020–5049. Again, CP turned over retired SD40–2s to EMD/Progress Rail, but this time the units were sent to Mid-America Car Company in Kansas City, Mo., for parts removal and then forwarded to Bombardier in Sahagún, Mexico, for the complete rebuild.

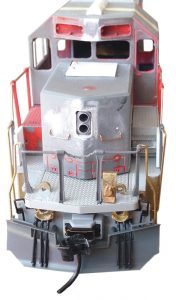
Though these locomotives look very similar in appearance, there are quite a few differences between units. While all the units have been rebuilt from CP’s SD40–2 fleet, some of CP’s SD40– 2s were inherited from CP’s acquisition of the former SOO Line. These units have sloped American-style steps, unlike the straight vertical Canadian-style steps. Other spotting differences between units include features like angled traction blower housings versus straight blower housings and open-top fans versus cap-top or Q-style radiator fans. For the rebuild process, EMD also made some changes between orders. The first 20 units have the ditch lights positioned under the anti-climber whereas the second order has them mounted atop the deck. The first order has primarily black grab irons while the second order has them painted white. EMD also used a different-style brake wheel and applied Positive Train Control antennas to the second order.
 Lengthening the Cab
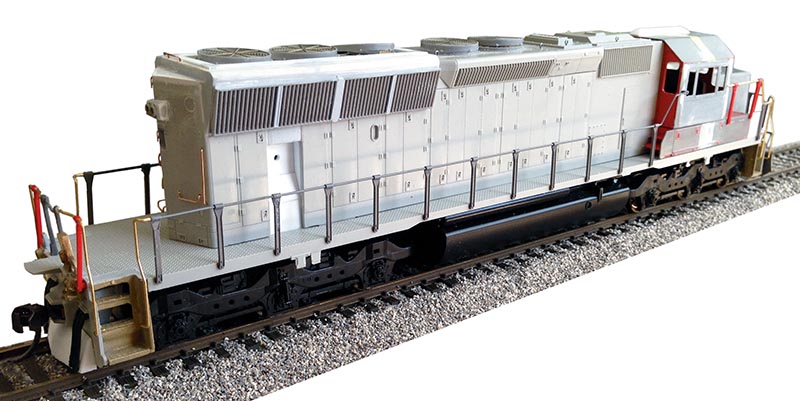
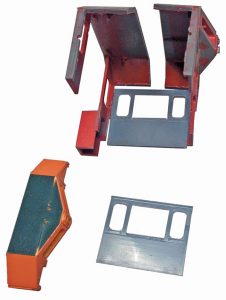
The first step in building an SD30C-ECO is altering the cab. The goal is to create a cab that is 1.052-inches long. First, split the Kato cab in half. Begin by making vertical cuts on the side walls, then make a cut across the top of the cab roof. Lastly, cut out the area above the side window to separate the halves. Clean up your cuts with a small file or sanding stick.
Next, I added new cab sides from Cannon and Co. Make sure after you make your cuts that you test-fit these before attaching them to the cab. Glue the cab side in place with ACC and allow it to dry thoroughly. Measure and cut a piece of cab roof to size. Glue this in place, and start filling the gaps with modeler’s putty. This process took a lot of filling, sanding, and more filling and sanding. Make sure your seams are as smooth as possible. Taking time here will create a better model.
Headlight Removal & Antenna Dome
Next, sand off the round bulge beneath the headlight housing. The holes for the headlight lenses also need to be filled. I typically don’t reuse the stock light tubes that come with units, so I glued the tubes into the headlight housing and cut them off so that they are flush. Carefully remove the headlight casting with a sharp hobby knife and sand the area smooth. When sanding, be careful not to sand off the gasket detail on the number boards.
Fill in the two horn-mounting holes located on the roof. I just glued the horn in place and, once it was dry, cut it off flush with the roof, sanding the area with fine sandpaper until smooth.
The antenna dome is made from a section of solid half-round styrene (Plastruct 90885). Cut the styrene to one inch in length and sand both ends down to the proper slope. Be careful here as both ends do not have the same slope. The rear should have a slightly steeper angle.
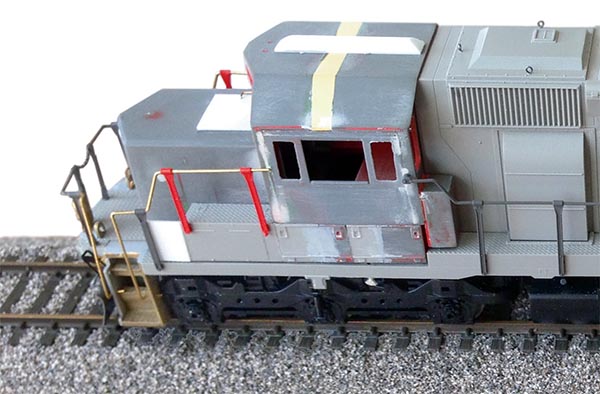
The antenna dome is made from a section of solid half-round styrene (Plastruct 90885). Cut the styrene to one inch in length and sand both ends down to the proper slope.
New Radiator Section
To install the new flared radiator assembly, begin by cutting out the stock SD40–2 radiator section from the shell and clean up the edges with a sanding stick. The new radiator section from DLH Locomotive Works won’t fit in this space, so you’ll have to shorten it. I removed a section from the middle of the DLH radiator assembly and glued the two halves back together, adding a couple of strips of styrene inside to strengthen it. I filled the gaps where I made my cuts and sanded everything smooth. The radiator grilles are from Cannon and Co. Before installing them, I glued a strip of 0.030×0.040 styrene between the two screens. The radiators on an SD30C-ECO are divided into two sections.
 To model this, I measured to the middle of each radiator section and added Model Master white primer to fill in the groove on the radiator. This will take a few coats until the groove is filled. Once it was dried, I sanded the front face smooth and glued it to the DLH radiator section. The DLH radiator kit comes in two halves that should be test-fitted but not glued together. We will be drilling holes into the top side first for radiator fan installation — this is easier if the radiator isn’t glued together.
Speaker Prep
To equip my locomotive with sound, I cut a space into the bottom of the radiator section to accommodate a speaker. I prefer cell phone speakers from Zimo for my sound installs. I cut the space in the bottom section of the new radiator casting to fit this speaker. At the other end of the radiator section, I removed additional material so that I could have access to the rear headlight area for the LED installation. Set the radiator aside until it is time to install the rear sand hatch. We will glue it to the shell after we complete the rear-end modifications.
Cooling Fans
For my SD30C-ECO, I chose Cannon and Co. radiator and dynamic brake fans. In my opinion, these look fantastic and go together relatively easily. If you haven’t installed fans onto a blank plate before, here are a couple of tips. Make sure you take your time drilling the mounting holes for your fans. The first time I did this, I rushed and found myself rebuilding the material under the fan housings because my holes were too large. Take your time to avoid this frustration. I primarily use a step drill for this process.
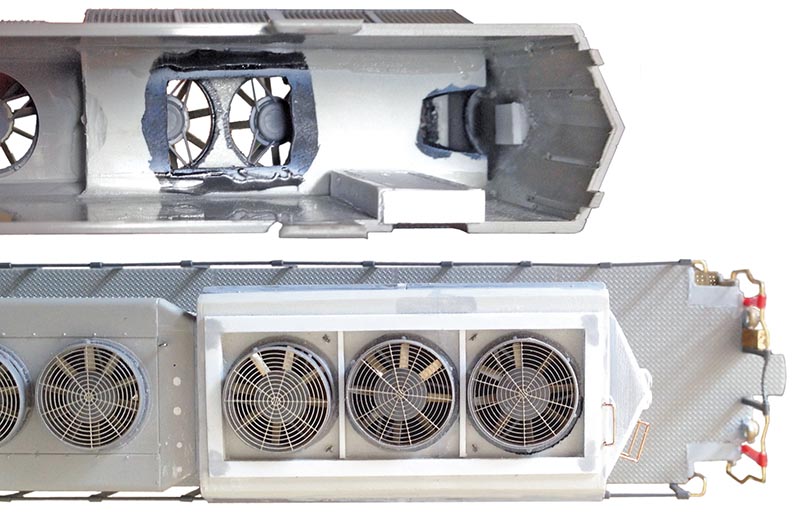
Start by removing the horizontal divider strips on the top of the stock DLH radiator housing. Installation of the fans is pretty simple. The instructions provided by Cannon and Co. describe how to do it and advise the proper drill bit size to use. I install the fan base first and apply the screens to the upper half of the fans. I don’t apply the fan blades or glue the top half of the fan rings to the base until I paint the inside of the housing. I would advise airbrushing the fan blades and painting the inside of the fan housing with True Line Trains (TLT 010002) CP Bright Red paint first, and then glue everything together. I do this to get a good coat of paint on the inside of the fan housings.
After installing the radiator fans, install new horizontal divider strips using 0.030×0.030 Evergreen styrene. On the top of the radiator housing, there is a thin frame. I sanded off the stock frame and glued on Evergreen 0.010×0.080 styrene strip. I then painted the inside of the radiator housing black to create the appearance of depth. Once the paint is dry, I glued the two halves of the radiator together. Don’t apply it to the shell until later.
I drilled No. 80 holes and applied Details Associates 229-2206 Lift Rings where appropriate. I added the new horn just behind the last dynamic brake fan…